Printed from acutecaretesting.org
June 2001
Establishment of "metrological traceability" for quality control materials and calibrators
INTRODUCTION
The term “metrological traceability” is defined as:
- ”The property of the result of a measurement or the value of a measurement standard that relates it to a stated reference, usually a national or international standard, through an unbroken chain of comparisons with stated uncertainties.”
The concept of “metrological traceability” is a subject which will be in focus in the future.
With the coming implementation of the new In Vitro Diagnostic Directive (IVD Directive) [1], a number of standards will be issued. The requirements of the IVD Directive are specified in a number of standards.
Some of the standards are prepared both by the International Standard Organization (ISO) and the European Committee for Standardization (CEN). So, these joint standards will be effective in the EU and in all countries which are members of ISO.
Among these standards are prENISO 17511 [2], which deals with “metrological traceability”; ISO/CD 15198 [3], which deals with the validation of the manufacturers’ recommendations for user QC; and prEN 13640 [4], which deals with the stability testing of IVD reagents.
Requirements concerning metrological traceability of calibrators have existed in the USA for several years.
METROLOGICAL TRACEABILITY
The concept of “metrological traceability” for quality control (QC) and calibrator materials requires that a number of subjects are dealt with:
-
A traceability chain, stating traceability and uncertainty for each step in the measuring process, must document the traceability.
-
Certified reference materials must be used.
-
Process control assuring homogeneity of each produced lot must be implemented.
-
Statistical methods must be applied for the determination of the values and the uncertainties of the values of the finished product.
-
The claimed shelf life of the product must be documented.
-
The performance test of the product must be documented.
To maintain the “metrological traceability” for QC and calibrator materials, it is necessary to establish a traceability chain where each step in the measuring chain is described and the uncertainty connected with each step is evaluated.
From this traceability chain and the connected uncertainty evaluation, the standard uncertainty (Table I) for each parameter of the product can be calculated. When the combined standard uncertainty (Table I) is known, then the expanded uncertainty (Table I) is calculated by multiplying with the coverage factor (Table I) of two.
|
Term |
Definition |
|
Standard uncertainty |
Uncertainty of the result of a measurement expressed as a standard deviation. |
|
Combined standard uncertainty |
Standard uncertainty of the result of a measurement when that result is obtained from the values of a number of other quantities, equal to the positive square root of a sum of terms, the terms being the variances of these other quantities weighted according to how the measurement result varies with changes in these quantities. |
|
Coverage factor |
Numerical factor used as a multiplier of the standard uncertainty in order to obtain an expanded uncertainty. (Typically a coverage factor will be in the range two to three, to cover a 95-99 % confidence interval) |
|
Expanded uncertainty |
Quantity defining an interval about the result of a measurement that may be expected to encompass a large fraction of the distribution of values that could reasonably be attributed to the measurand. |
TABLE I: Uncertainty definitions.
The expanded uncertainty is a general concept which typically estimates a 95 % confidence interval for the true value of each parameter.
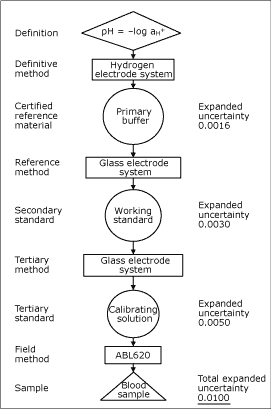
When setting up a traceability chain, the first element of this will normally be a certified reference material, produced by a national metrology institute. An example of a traceability chain is given in Fig.1.

FIG. 1: pH traceability chain. A traceability chain, here exemplified by pH of a blood sample, is a very important feature when performance characteristics are evaluated. The traceability chain shows how the stated values of each step are related to a reference material, usually a national or international standard, through an unbroken chain of comparisons with stated uncertainties.
The chain also indicates the types of methods used for evaluations (definitive method, reference method, field method). The Reference Laboratory produces and certifies working standards for the liquid production, so that traceability can be maintained for all parameters.
In 1995, the laboratory was appointed Danish National Primary Laboratory within the field of pH. The laboratory has been working with the establishment of metrological traceability of products for more than 20 years
To be able to calculate the expanded uncertainty for each parameter of the product, where a production lot can consist of more than 10,000 separate units, it is necessary to have process control and to utilize statistical sampling plans, so that the variability of all the units can be evaluated.
This variability must be included when the combined standard uncertainty is calculated.
The values given for each parameter of a QC or calibrator product must be valid for the whole period of use until the expiration date, even if the product is stored at the maximum allowed temperature for the whole period.
This requires that extensive stability studies are performed. For a new product, at least three lots of each product must be tested in real-time tests. Every time a modification is implemented, the effect of this modification on the stability of the product must be evaluated.
These stability tests make it possible to determine the worst-case alteration of the value of each parameter during storage. This alteration is then transferred to an uncertainty, and this contribution is included when the combined standard uncertainty is calculated.
Finally, when releasing a QC product, extensive performance tests must be carried out to establish the assigned values and control limits, based on valid statistical material. The performance after the release of a QC system must periodically be re-evaluated by the manufacturer by investigating the performance of the system at several user locations.
BENEFITS OF METROLOGICAL TRACEABILITY
The establishment of “metrological traceability” to the same definitive method and the activities during production related to this will result in a number of benefits:
-
Clinical decision limits are comparable within a region.
-
Results obtained on different instruments in different laboratories are comparable.
-
Higher confidence in the clinical decisions is offered, based on the results obtained with the analyzer.
-
Fewer redeterminations are called for.
-
Long-term costs are lowered.
The establishment of “metrological traceability” for both calibrators and QC materials will result in a higher overall quality of the results obtained with the analyzers. This will be the result of a number of different activities, which will be performed by the manufacturer before an analyzer and a QC material for an analyzer can be released.
For a user of QC material, it is essential that the QC program is devised, so that a very high probability of detecting if an instrument is out of control is obtained. At the same time, it is vital that a minimum of false out-of-control detections are observed.
This requires a high quality of the control material. The user has no benefit from a control system if it is not absolutely certain that an out-of-control detection is because the analyzer is out of control and not because the control system has a poor homogeneity.
Therefore, the assigned values and the control limits of a QC system for a particular instrument must be established based on valid statistical material and the fact that the manufacturer is able to produce the QC product in a well-documented and controlled way.
“Metrological traceability” makes it possible for a hospital, where several different instruments are in use, to determine the uncertainty of the results obtained from each instrument based on the same certified reference material.
Therefore a general uncertainty concerning a result obtained at a random instrument can be calculated. This results in comparable measurements obtained on different instruments and in different laboratories.
A necessity for setting up clinical decision limits is that the result for a particular parameter is the same no matter which instrument is used.
To have identical clinical decision limits at several hospitals in a region requires that all measurements are metrologically traceable to the same stated reference material and requires interchangeability of the results from all analyzers determining the particular parameter in that region.
This will only be possible when all manufacturers provide “metrological traceability” for both calibrators and QC materials and document the performance criteria for each instrument in a clear and unambiguous way, also stating which reference methods have been used for establishing the performance criteria.
Establishing “metrological traceability” for QC and calibrator materials results in higher quality of these products. When the user observes higher quality, then higher confidence in the results will emerge. When high confidence in the results exists, then fewer remeasurements will be the result, and thus lower long-term cost of the QC program will be the result.
CONCLUSION
With the implementation of the new IVD Directive, a number of standards will be implemented. One of these will be a standard for “metrological traceability”. Application of this standard will give higher quality of the products with regard to transferability of results between different regions.
For the user of the IVD product, the benefit is that these products meet a number of government regulations – in many cases both regulations from the USA and EU. This will mean that the user has better possibilities of obtaining a clear statement of the performance characteristics before a definite product is chosen.
Higher confidence in the obtained results should emerge for the product in use.
References+ View more
- Directive 98/79/EC of the European Parliament and of the Council of 27 October 1998 on in vitro diagnostic medical devices. L331/1 EN official journal of the European Communities. December 1998.
- Draft prENISO 17511. Measurement of quantities in samples of biological origin. Metrological traceability of values assigned to calibrators and control materials. December 2000.
- ISO/CD 15198. Clinical laboratory medicine. Validation of manufacturer’s recommendation for user quality control. December 1998.
- Draft prEN 13640. Stability testing of in vitro diagnostic reagents. September 2000.
References
- Directive 98/79/EC of the European Parliament and of the Council of 27 October 1998 on in vitro diagnostic medical devices. L331/1 EN official journal of the European Communities. December 1998.
- Draft prENISO 17511. Measurement of quantities in samples of biological origin. Metrological traceability of values assigned to calibrators and control materials. December 2000.
- ISO/CD 15198. Clinical laboratory medicine. Validation of manufacturer’s recommendation for user quality control. December 1998.
- Draft prEN 13640. Stability testing of in vitro diagnostic reagents. September 2000.
Acute care testing handbook
Get the acute care testing handbook
Your practical guide to critical parameters in acute care testing.
Download nowScientific webinars
Check out the list of webinars
Radiometer and acutecaretesting.org present free educational webinars on topics surrounding acute care testing presented by international experts.
Go to webinars


